Kubernetes Discovery and Privilege Levels
Last modified on April 7, 2025
Automatic resource discovery and privilege levels for Kubernetes allow you to present StrongDM admins with a list of groups discovered within the cluster and arrange for users of your cluster to get the right amount of access through those groups at the right time. This can be used in several ways:
- You can give different users various levels of standing access to the same resource through adding privilege levels to StrongDM roles.
- You can give users the ability to request various levels of temporary access to a resource through adding privilege levels to access workflows, which users can then select from when requesting access via the Admin UI, CLI, or integrations with apps such as Slack.
- You can assign various privilege levels to users connecting to the cluster through policies, based on their contextual situation.
These features solve the problem of having to add multiple resources to StrongDM using different credentials, in order to provide varying levels of access to the same cluster. They also provide a convenient way to escalate and de-escalate access within the cluster with StrongDM roles, Just-in-Time access with access workflows, and policies that allow or forbid access based on privilege levels, or are used to grant them.
This guide introduces the concept of automatic resource discovery and how to implement privilege levels when providing access to your clusters.
Resource Discovery
If a Kubernetes resource is added to StrongDM and configured with resource discovery enabled, StrongDM continuously discovers information about that Kubernetes cluster. When a user visits the Discovery tab for that cluster in the Admin UI, the latest available information is displayed.
The following items are discovered within the cluster:
- Subjects (users, groups, and service accounts)
- RoleBindings and ClusterRoleBindings
- Namespaces
- Roles and ClusterRoles
- Rules (including Labels and annotations)
This information is made available to admins in the Admin UI, by visiting Resources > Clusters and clicking the particular resource, then the Discovery tab. In the Discovery tab, admins are able to view a list of subjects that is searchable by name and kind. When a subject is selected, the panel to the right displays a list of Roles and ClusterRoles that are associated with the subject, and the details of each Role, including an option to view rules associated with that Role as well.
Discovery is very quick, usually within moments of changes being made within the cluster. If the connection to the cluster is lost due to networking issues, the discovery information is lost within a few hours, but is reacquired when the cluster becomes available again.
Configure clusters to discover resources
When a Kubernetes cluster is added as a resource to your StrongDM organization, an option can be enabled called Enable Resource Discovery. Checking this box in the Admin UI is all that is required to begin automatic discovery within the cluster. If your cluster is configured in StrongDM to use Identity Sets, you also need to add a Discovery Username to the configuration settings, which is the Kubernetes user that you wish automatic discovery to occur with. For clusters set up with leased credentials, the leased credentials are used.
Discovery also requires that you set up a ClusterRole and apply it to the Kubernetes user that is used for discovery, with the following rules:
rules:
  - apiGroups: [""]
    resources: ["namespaces", "serviceaccounts"]
    verbs: ["list", "get", "watch"]
  - apiGroups: ["rbac.authorization.k8s.io"]
    resources: ["roles", "rolebindings", "clusterroles", "clusterrolebindings"]
    verbs: ["list", "get", "watch"]
These rules are the minimum needed for discoverability across the cluster and could be adjusted further based on the discretion of the Kubernetes admin to add further permissions, narrow the scope to particular namespaces, or make other similar alterations.
Kubernetes discovery information
In the Admin UI, under Resources > Clusters and in the details view for the cluster you created, you can see that there is a Discovery tab. The information presented in that tab is what was able to be discovered about your cluster given the connection information and credentials for the cluster, and the discovery username you provided. In the left panel there is a list of subjects (users, groups, and service accounts). If the list of subjects is long, it can be filtered by type or searching for strings in the subject names.
When you select a subject, the Kubernetes Roles associated with that subject are presented on the right. If the list of Roles associated with that subject is too long, it can also be searched or filtered by namespace. Each Role listed has a View Rules button, which expands a table of information about Rules from the selected Role.
Privilege Levels
When a Kubernetes resource is added to StrongDM, users of that resource have exactly the privileges afforded to the Kubernetes credential used to add the resource to StrongDM. If Identity Aliases are in use, they also have any privileges granted via native RBAC to their Identity Alias. However, this arrangement would typically require multiple resources to be added to StrongDM if you wish to provide users with multiple options of privileges to request.
Privilege levels offer a more practical solution. During discovery, clusters are scanned for Kubernetes groups and those groups are selectable when creating roles, access workflows, access requests, and policies. The administrator chooses the privilege levels to be granted to a role or be made available upon request. The user is then able to access the cluster with the permissions offered by the credentials used to configure the cluster in StrongDM and any provided by mapping their Identity Alias (if used), plus any extra access that granted privilege levels provide.
How privilege levels work
When a user is granted a privilege level “alpha” on a cluster, all requests that user makes to that cluster are implicitly modified to impersonate the Kubernetes group “alpha” within that cluster. Accordingly, you must create Roles, ClusterRoles, RoleBindings and ClusterRoleBindings on your cluster to both define the permissions the privilege level “alpha” grants, as well as to allow StrongDM to impersonate that group on the user’s behalf.
Configure clusters to use privilege levels
In order to correctly leverage privilege levels, you must set up RBAC resources on your cluster to map your Leased Credentials or Identity Aliases to Kubernetes Roles or ClusterRoles. Go through the following steps, creating the appropriate Kubernetes objects as you see fit, or confirming that you have objects to fulfill the intended purpose.
Define the permissions for the privilege level:
To define what exactly granting a privilege level
engineeringenables a user to do in your cluster, create a Role/ClusterRole. In the following example, we wish to let users watch, get, or list pods when they are granted the privilege levelengineering:# engineering role apiVersion: rbac.authorization.k8s.io/v1 kind: Role metadata: namespace: default name: engineering rules: - apiGroups: [""] # "" indicates the core API group resources: ["pods"] verbs: ["watch","get","list"]Associate the Role with the Kubernetes group matching your privilege level:
Create a RoleBinding or ClusterRoleBinding, associating the Role or ClusterRole to the group
engineering:# engineering role binding apiVersion: rbac.authorization.k8s.io/v1 kind: RoleBinding metadata: name: engineering namespace: default subjects: # You can specify more than one "subject" - kind: Group name: engineering # "name" is case sensitive apiGroup: rbac.authorization.k8s.io roleRef: kind: Role apiGroup: rbac.authorization.k8s.io name: engineering namespace: defaultAllow StrongDM to impersonate the group
engineering:Create another ClusterRole, granting permission to impersonate the group
engineering. If you are using privilege levels alongside Identity Aliases, you likely need to grant permission to impersonate all users. The following example grants permission to impersonate all users, groups, and service accounts:# impersonator minimal permissions # needed to elevate privileges. apiVersion: rbac.authorization.k8s.io/v1 kind: ClusterRole metadata: name: sdm-impersonator rules: # impersonate all users, groups, and service accounts # needed for Identity Aliases to work. - apiGroups: [""] # "" indicates the core API group resources: ["users", "groups", "serviceaccounts"] verbs: ["impersonate"]Associate the
impersonatorClusterRole with the Kubernetes User or Service Account whose credentials you intend to use to add the cluster resource to StrongDM:apiVersion: rbac.authorization.k8s.io/v1 kind: ClusterRoleBinding metadata: name: sdm-impersonator-binding subjects: # Specify the Kubernetes User or ServiceAccount whose credentials you are using in StrongDM - kind: User name: <STRONGDM_USER> # "name" is case sensitive apiGroup: rbac.authorization.k8s.io - kind: ServiceAccount name: <STRONGDM_SERVICEACCOUNT_NAME> # "name" is case sensitive namespace: <STRONGDM_SERVICEACCOUNT_NAMESPACE> roleRef: kind: ClusterRole name: impersonator apiGroup: rbac.authorization.k8s.ioIf using Identity Aliases, make sure that your cluster is also set up with a healthcheck user, as detailed in Identity Aliases.
Access workflows
Privilege levels can be used with workflows and requests to allow users to request particular levels of access to the cluster for a set duration of time.
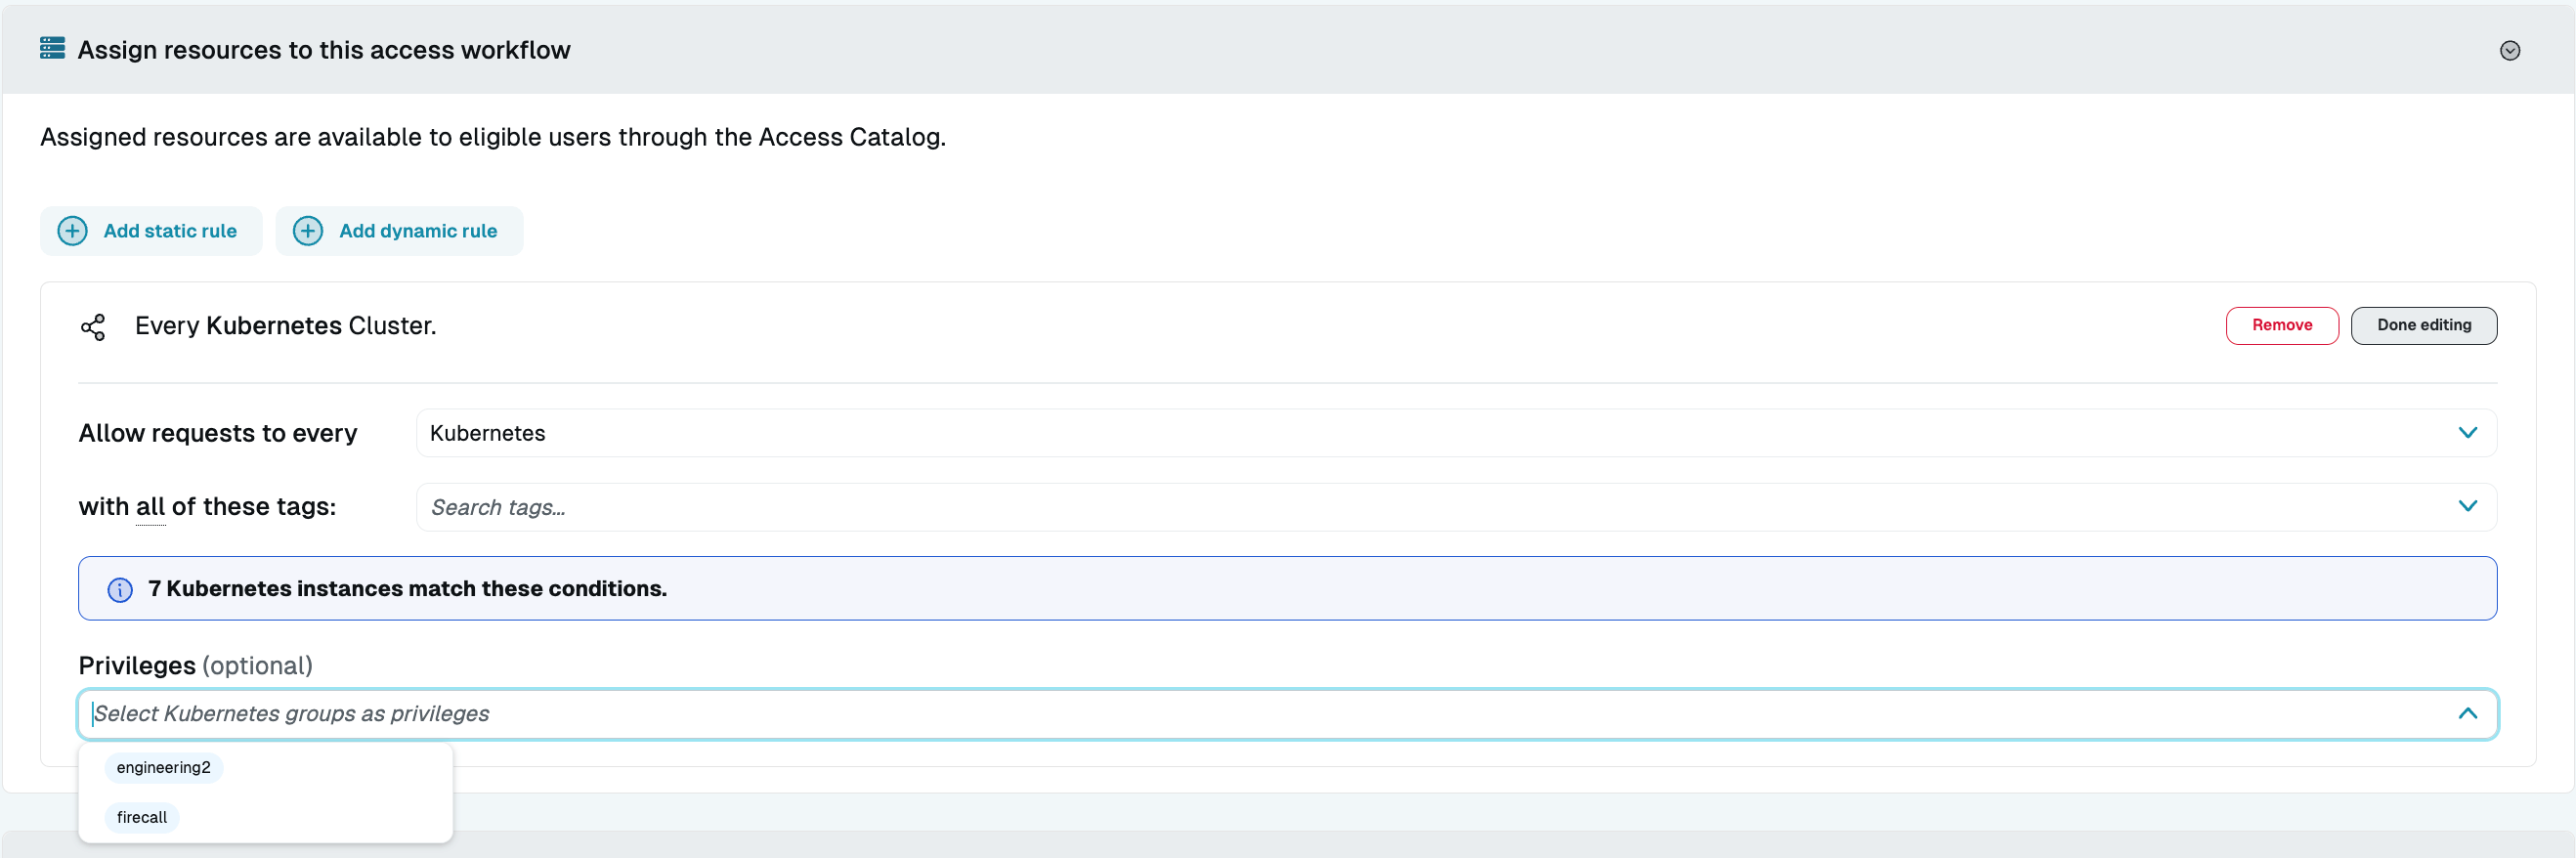
When creating an access workflow, resource discovery provides a list of available Kubernetes groups to use as privilege levels. You can also add your own options if your configuration requires that, or if you are not using discovery. Adding privilege levels allows users to request different levels of access within the resource.
If there is ever a situation where the user could request access to a resource through multiple access rules, and one stipulates the use of privilege levels and the other does not, the privilege levels are optional.
Access requests
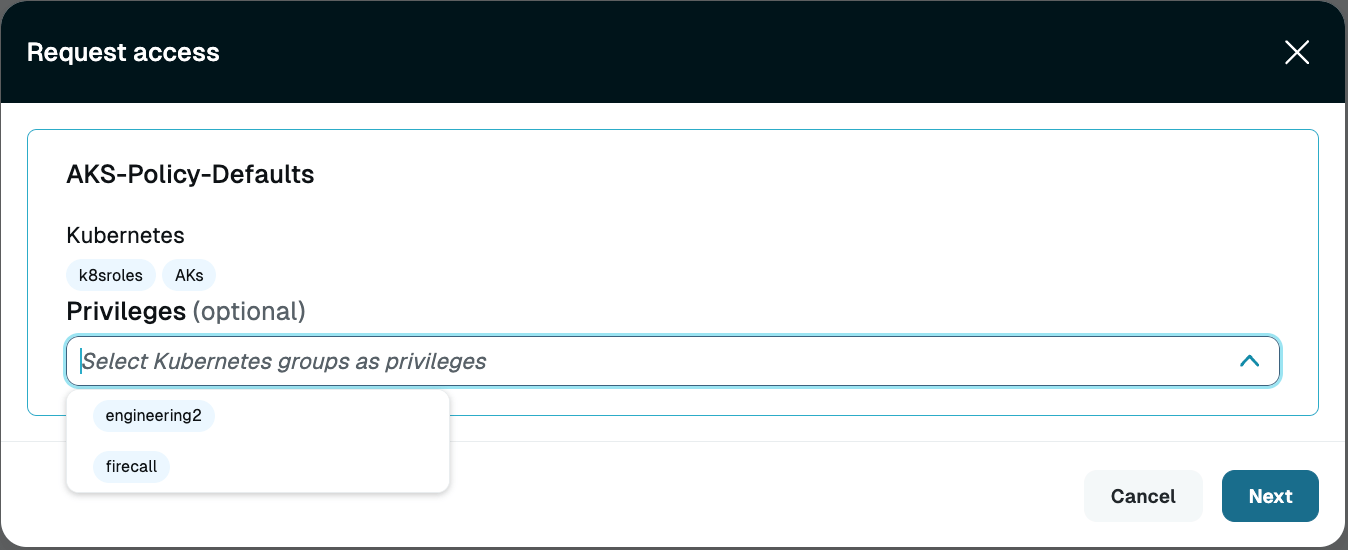
When making access requests using this workflow, users are able to select from the provided list of privilege levels as options (or choose none to request the standard level of access they are granted without privilege levels). Multiple privilege levels can be requested at once. If the user does not select privilege levels when they are required by the access rule, the user is notified of that in the resulting error message.
Once their request is approved, the user has access to the cluster(s) they requested through StrongDM. When they land in the cluster, they have the Kubernetes groups that were assigned via privilege levels.
In addition to the Admin UI, users can make requests involving privilege levels in Slack, Teams, or Jira (if any of those integrations are used by your organization) as well as the StrongDM CLI.
When viewing the catalog of StrongDM resources in the CLI (sdm access catalog) users are able to see the privileges that are available to them for a cluster. When making an access request at the CLI, with sdm access to users can append a --k8sGroup=foo flag to request a specific privilege level with their request.
-k8sGroup flags can be added to a request made using the CLI to request multiple privilege levels.Roles
Privilege levels can be used with roles to provide different sets of users with different levels of standing access to the same cluster resource.
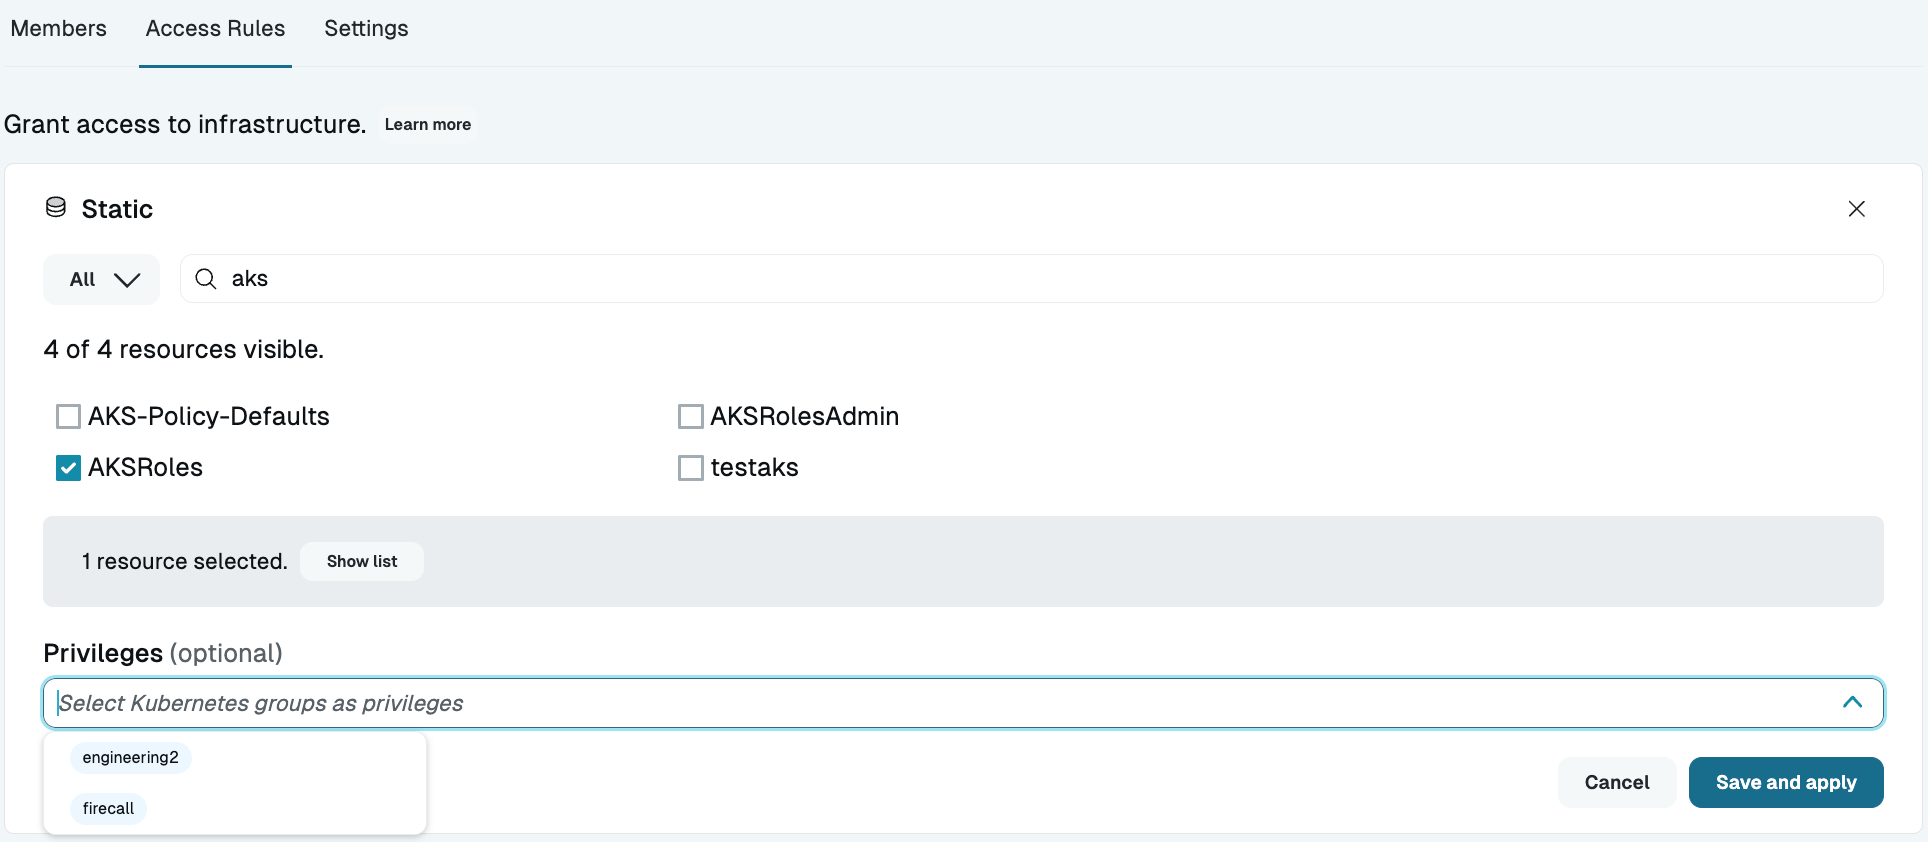
When creating a StrongDM role to provide users with standing access to resources, resource discovery provides a list of available Kubernetes groups to use as privilege levels. You can also add your own options if your configuration requires that, or if you are not using discovery. Adding privilege levels allows different roles to have different standing access privileges on the same resource.
For example, if you have a cluster called “k8s-test-cluster”, you might create it using Kubernetes credentials that don’t give much access within the cluster at all. Then, you could create three different roles in StrongDM to give to users that grant access to this cluster: “Service”, engineering, and “Admin”. Each of these StrongDM roles could then have access rules that grant users one or more corresponding groups within your cluster, providing the access those users need in the cluster. Now, The roles can be assigned to users and service accounts to give them various levels of standing access to the same cluster.
When creating the access rules for the role, upon selecting Kubernetes resources (or rules that would include Kubernetes resources) you have the option to add privilege levels and be presented with the discovery list. So for your engineering StrongDM role, perhaps you might decide to use a rule to grant access to all development and staging Kubernetes clusters, and add the privilege levels “foo” and “bar”. Now, you can assign engineers to the engineering StrongDM role, and they are able to access all development/staging clusters through StrongDM. When they land in the cluster, they have the groups “foo” and “bar”.
Policy
Privilege levels can also be added or limited with policies. See the following examples for more details.
action statements used in policies pertaining to Kubernetes resources should be appropriately scoped. Typically, you should specify an action (action == "foo") rather than leaving it open-ended (action,), particularly if they include annotations that interrupt the user, such as @justify(). If not, every new action results in a new challenge, which can be disruptive.Add privilege levels with policy
This example would permit a specified role to perform a specified action against a particular resource, with the added privilege levels “foo” and “bar”.
@k8s_impersonate_groups("foo, bar")
permit (
  principal in StrongDM::Role::"r-1caa595464152e78",
  action == K8s::Action::"fetchPrivileges",
  resource in StrongDM::Resource::"rs-123c12d5654743g66"
);
Forbid based on privilege levels present
Forbid the “impersonate” action if the user’s privilege levels do not contain “devops”, “qa”, or “marketing”.
@error("invalid group")
forbid(
  principal,
  action == K8s::Action::"impersonate"
  resource
) when {
  context has k8s && !["devops","qa","marketing"].containsAll(context.k8s.groups)
};
Privilege level limitations
- If you use an access rule to provide access to a group of five AKS clusters, and you select the
engineeringprivilege level as one of your options, but one of the five clusters does not actually have a corresponding Kubernetes group forengineering, nothing happens. When the user connects to any of these clusters, they are dropped in with theengineeringgroup attached, and if that doesn’t exist on the particular cluster they’re connecting to, they just won’t get the expected privileges. Conversely, if an admin at some point adds theengineeringgroup to that fifth cluster, such an access rule automatically grants the same users that privilege level when connecting to the cluster, resulting in the potential for unplanned privilege escalation if the Kubernetes administrator and the StrongDM administrator are not in sync. - All Kubernetes resource types that StrongDM supports support discovery and privilege levels except for the “User Impersonation” resource types.
- If privilege levels are selected in an access rule as part of an access workflow, the user is required to choose one of those privilege levels, unless there is a second access rule that applies to the same resource for which the admin did not select any privilege levels. When the admin chooses privilege levels for a resource or group of resources, they are requiring that the user make a choice from those options.